


Do you think preparing a graphic file for wall printing is a task for professional graphic designers? Nothing could be further from the truth. It’s actually a simple, schematic process that you’ll master in a few minutes. Learn the six steps (half of which are optional) that take you from a raw file to a finished print. See for yourself that it’s easy.
From computer to wall – what does the entire path of preparing a file for wall printing look like?
The starting point is a graphic file on your computer. The preparation path to print is shorter than you might think. It looks like this:
DPI calculator (optional) → basic editing (optional) → colour profile → save file as TIFF (optional) → transfer to printer → RIPping.
You have six steps to complete – just that. What’s more, three of them are optional (explained in the following paragraphs).
At the outset, we note that the industry standard for preparing files is Photoshop. At the in-person training in Szczecin, we show you how to use its most essential functions. We’re confident that after proper practice, you’ll be using exactly these capabilities.
This is confirmed by Krzysztof Guzdaj – Head of Technical Support at wall printers⁺:
Many clients ask us at the start whether they’ll be able to handle preparing graphic files for wall printing. I always reassure them, because it’s a process that absolutely anyone can master, regardless of experience. Step by step, we guide clients through the basics of Photoshop, which makes preparing a file independently completely straightforward. And when the file is ready, sending it to the printer comes down to just a few clicks – and you can get to work.
You can also complete the entire process using widely available tools, which we suggest in this article. These methods are enough to get started and for most simple jobs.
What will you need besides the wall printer?
- A computer, laptop or tablet with internet access (the device you have at home should be sufficient; you don’t need specialist equipment),
- a USB drive,
- and RIP software (e.g. Maintop, which you’ll receive with the printer).
And since you now know what equipment you need, we can move on to the actual instructions. Each of the six steps below is described so that you can complete it on your own, even if you’ve never worked with graphic files before.
Step 1: Check dimensions in the DPI calculator (optional)
Note: If your graphic file is of good quality (e.g. a photo taken on a modern smartphone, a professional file from a client, a file from a stock library) and you’re not planning a large-format print, you can skip this step.
Before you start editing, check whether your image is suitable for printing at the intended size.
What determines this is DPI – dots per inch, meaning the actual resolution of the file.
The standard we recommend is 100 DPI. At this value, edges viewed from a distance of 10 cm are sharp even for graphic files with precise details, and colours retain their saturation and intensity.
Take a look at how the same graphic file looks when printed at several different DPI values.
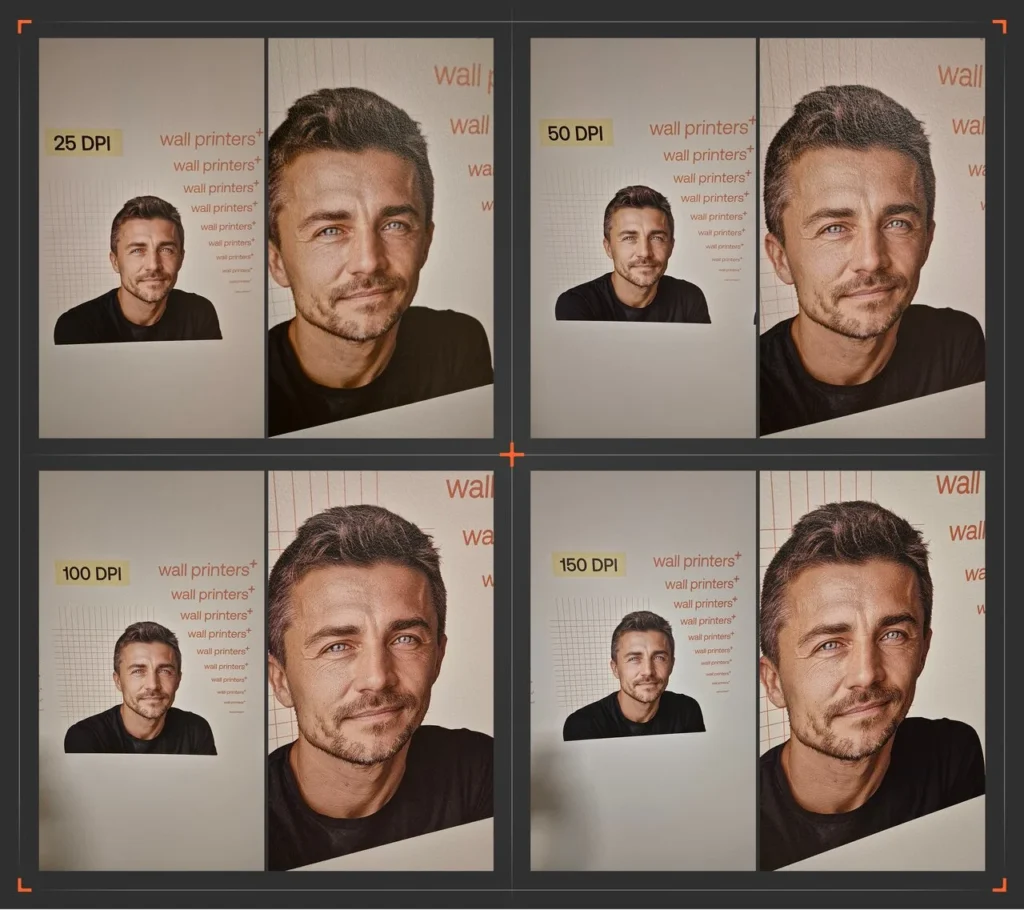
To check whether your file will maintain adequate quality when printed, use the wall printers⁺ DPI calculator. Enter the dimensions of your image or graphic file and the intended print size, and the calculator will work out what actual DPI value you’ll achieve.
How to check the file dimensions to enter into the calculator?
On Windows:
- Right-click the file and select Properties.
- Go to the Details tab.
- In the Image section, you’ll find the dimensions in pixels.
On macOS:
- Right-click the file and select Get Info.
- Expand the Dimensions section to see the file resolution in pixels.
Step 2: Crop the image or remove the background (optional)
Note: Skip this step if the composition of the file works for you or your client.
Cropping is useful when you want to print only a specific part of an image or graphic file, or when you want to remove empty spaces around the edges of the file.
You can use widely available alternatives to Photoshop for this – Canva or Photopea.
If, on the other hand, you want to print only a selected element, you’ll need to remove the background entirely. Automatic online tools such as remove.bg are great for this – they allow you to isolate the main element with a single click.
Step 3: Set the FOGRA39 colour profile
A laptop, phone and tablet screen displays images in RGB mode (red, green, blue). A printer, however, works with four inks: cyan, magenta, yellow and black. It processes colours in a slightly different way.
In every case, you need to make sure the printer correctly reproduces the colours in your file. This is done by setting the appropriate colour profile. It ensures that the colour you see on screen looks the same on the wall.
In Photoshop, this profile is found under the name FOGRA39, and in some free tools as ISO Coated v2 ECI.
Setting the colour profile is also usually done in Photoshop, but you can use free converters such as rgb2cmyk.org (set ISO Coated v2 ECI there).
Don’t skip this step if you want the colour of your print to be as close as possible to what you see on your device’s screen.
Step 4: Save the file as TIFF (optional)
Note: Skip this step if you’re working with Flexiprint.
Choosing the right file format matters for the final quality of the graphic. In the case of UV wall printing technology, the industry standard is TIFF.
Your graphic file is probably currently in JPG or PNG format. You need to convert it to TIFF, which doesn’t lose quality and works seamlessly with the printer software (this step is essential when later working with Maintop in Step 6).
How to do it? Here too you can use an online converter (such as Convertio) or learn how to perform this simple operation in Photoshop.
Step 5: Transfer the file to the printer
The simplest way is a USB drive. Copy the finished file onto it. Then plug it into the printer and transfer the relevant file to the machine’s drive.
This solution is convenient and works regardless of internet access.
Step 6: RIP the file and print
For the final stage you need RIP software – Maintop or Flexiprint – which will convert your graphic file into a format readable by the printer.
The process comes down to a few clicks. We’ll walk you through it using Maintop as an example, which you’ll receive with the wall printer⁺ pro.
Graphic file RIPping instructions:
- Open Maintop.
- Select File → New and reset the values.
- After clicking OK, a job card opens. Select your graphic file using File → Import Picture. Confirm your selection with the Open button.
- If the file has the correct proportions, select Adjust to Picture Size and confirm with OK.
- The graphic file you selected will appear in the work area.
- Select File → Print (at this point you begin the RIPping process).
- In the window you can change the height or width of the file and the print orientation (to maintain the highest possible quality, we recommend setting the target size in the graphic software at an earlier stage).
- Click Properties and select the number of Passes (the higher the number, the better the print quality; the safest setting for a beginner printer operator will be 12 passes).
- Click White Ink Setting and select the print mode: Spot Color with an underprint (prepared in Photoshop) or Blank for a white wall.
- To confirm the changes, click Print to File and save the file to the printer’s drive. A loading progress bar will appear on screen.
- Once loading is complete, your file is ready.
Summary: 6 steps you’ll master in one day
Check the dimensions in the DPI calculator if you are unsure about the quality.
Crop the photo or remove the background if needed.
Set the FOGRA39 (or ISO Coated v2 ECI) color profile.
Save the file as a TIFF if you are working with Maintop.
Transfer the file to the printer using a USB flash drive.
Rip it in Maintop or FlexiPrint and print.
In wall printing, the quality of a job is determined by a repeatable procedure, not talent. The available technology and the wall printers⁺ team will give you confidence at every stage of the work.
We know that there are still a few steps between theory and actual jobs. To simplify your path to your first paid job, we’ve created an intensive, full-day in-person technical training.
Step by step, we’ll teach you how to operate the wall printer: from correctly assembling the machine, through working with files, to the techniques that guarantee photographic print quality.
On top of that, the knowledge you’ve gathered will always be within reach thanks to the wall printers⁺ handbook. We created it to solve the challenges that everyone faces at the start. Inside, video tutorials, ready-made checklists and practical tips are waiting for you.
You’ll find a section dedicated to the topic of graphic files: including working in Photoshop, preparing white underprints, and using RIP software.
See this material to find out more.
If you feel this is the right direction for you but you need support at the start, let’s talk. Fill in the contact form and we’ll tell you everything you need to know.
FAQ – most common concerns
If after reading the instructions there’s still a “but what if…” in your head, this section is for you.
“Will I be able to handle the graphic files?”
You will! You have a precise set of instructions here – just follow them. Only a handful of our clients work with graphic files professionally, and all the rest manage just fine.
“Will I manage if I don’t know Photoshop?”
Yes – you have ready-made instructions from us that let you prepare a file for printing without Photoshop. And we’ll teach you the basic functions of the programme anyway: during the in-person training, through video tutorials and the How to make money with wall printing? course.
“Won’t I waste time in front of the computer instead of printing and earning?”
No, because preparing a file is a short and simple process whose basics you’ll master in just one day, and as many as three of the six steps are completely optional. When the graphic file is ready, sending it to the device is just a few clicks, which means you move straight on to the actual work.

